web Applets
Good to know
These applets are not accessible by USSD; It would be useless to enter * 141 # to try to launch a game for example.
Create a project
To get started, create an applet as previously presented: createYourFirstApplet

Once the project is created, click on it to open it gives that.
Structure of the application
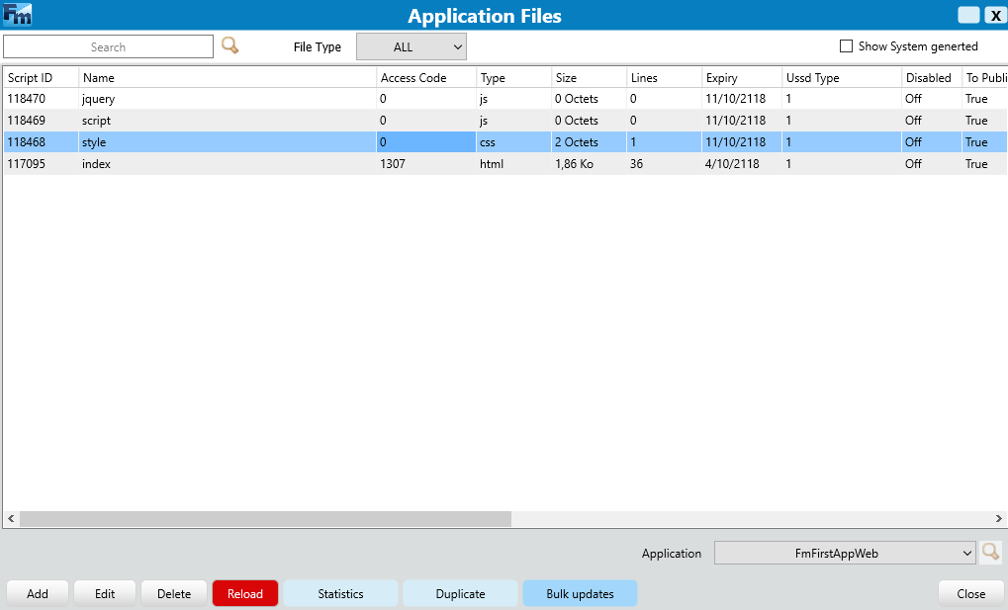
Here, the peculiarity of the project is that all .fm, .html, .js, .css files are created on the server side in the same folder called "Production"; the others are always imported server side, in another folder called "External".
Create a file
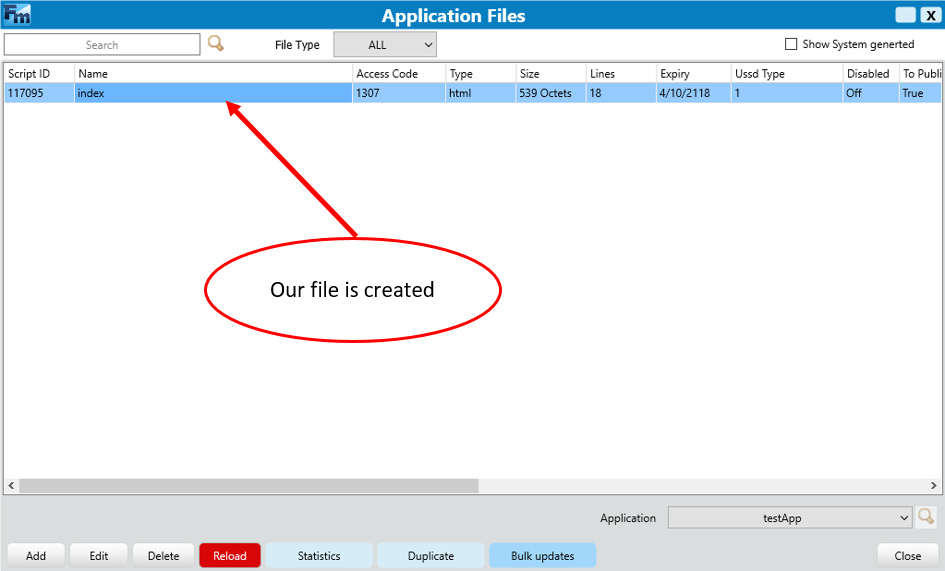
Now we will create our first file; click at the bottom left on the button "add", the window below appears. Follow steps below:
- 1. Like any web project the first file is usually the index, one must intentionally give it a name that distinguishes it from other files; So first we have to enter the file name.
- 2. To generate the Access code if itis the index file.
- 3. And at the end select the file type.
- 4. The file thus configured, click on the save button on the far left to save the changes.
Our file appears in the file area.
Notice:
- 1. the index file must be the only one to have an "Access code" otherthan 0.
- 2. for a project "Access code" is generated only once.
- 3. here the names of the files do not carry extension one simplydefines the type of file and the compiler does the rest.
- 4. all the files created in this window (Application files) are housed in the "Production" folder (we already talked about it);other files that can not be created from this interface such as images, videos and some libraries ... will be imported as Externals: we'll see how to do it in the rest of this tutorial.
Edit a file
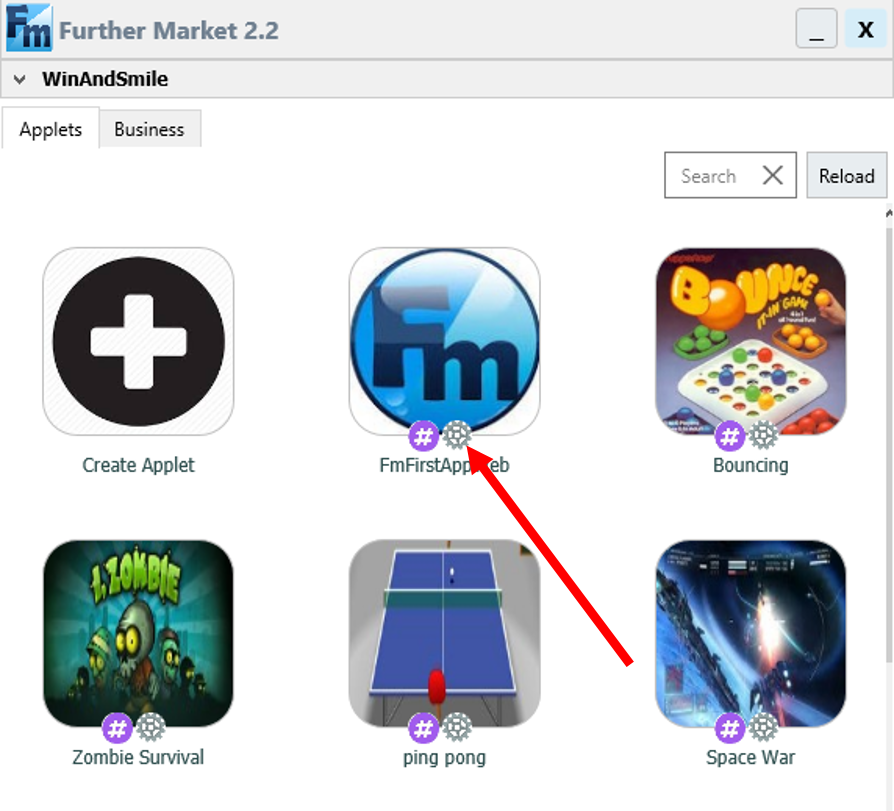
To modify a files imply double click on the file in question and then click on the icon of the gear system located on the left as shown in the figure below.
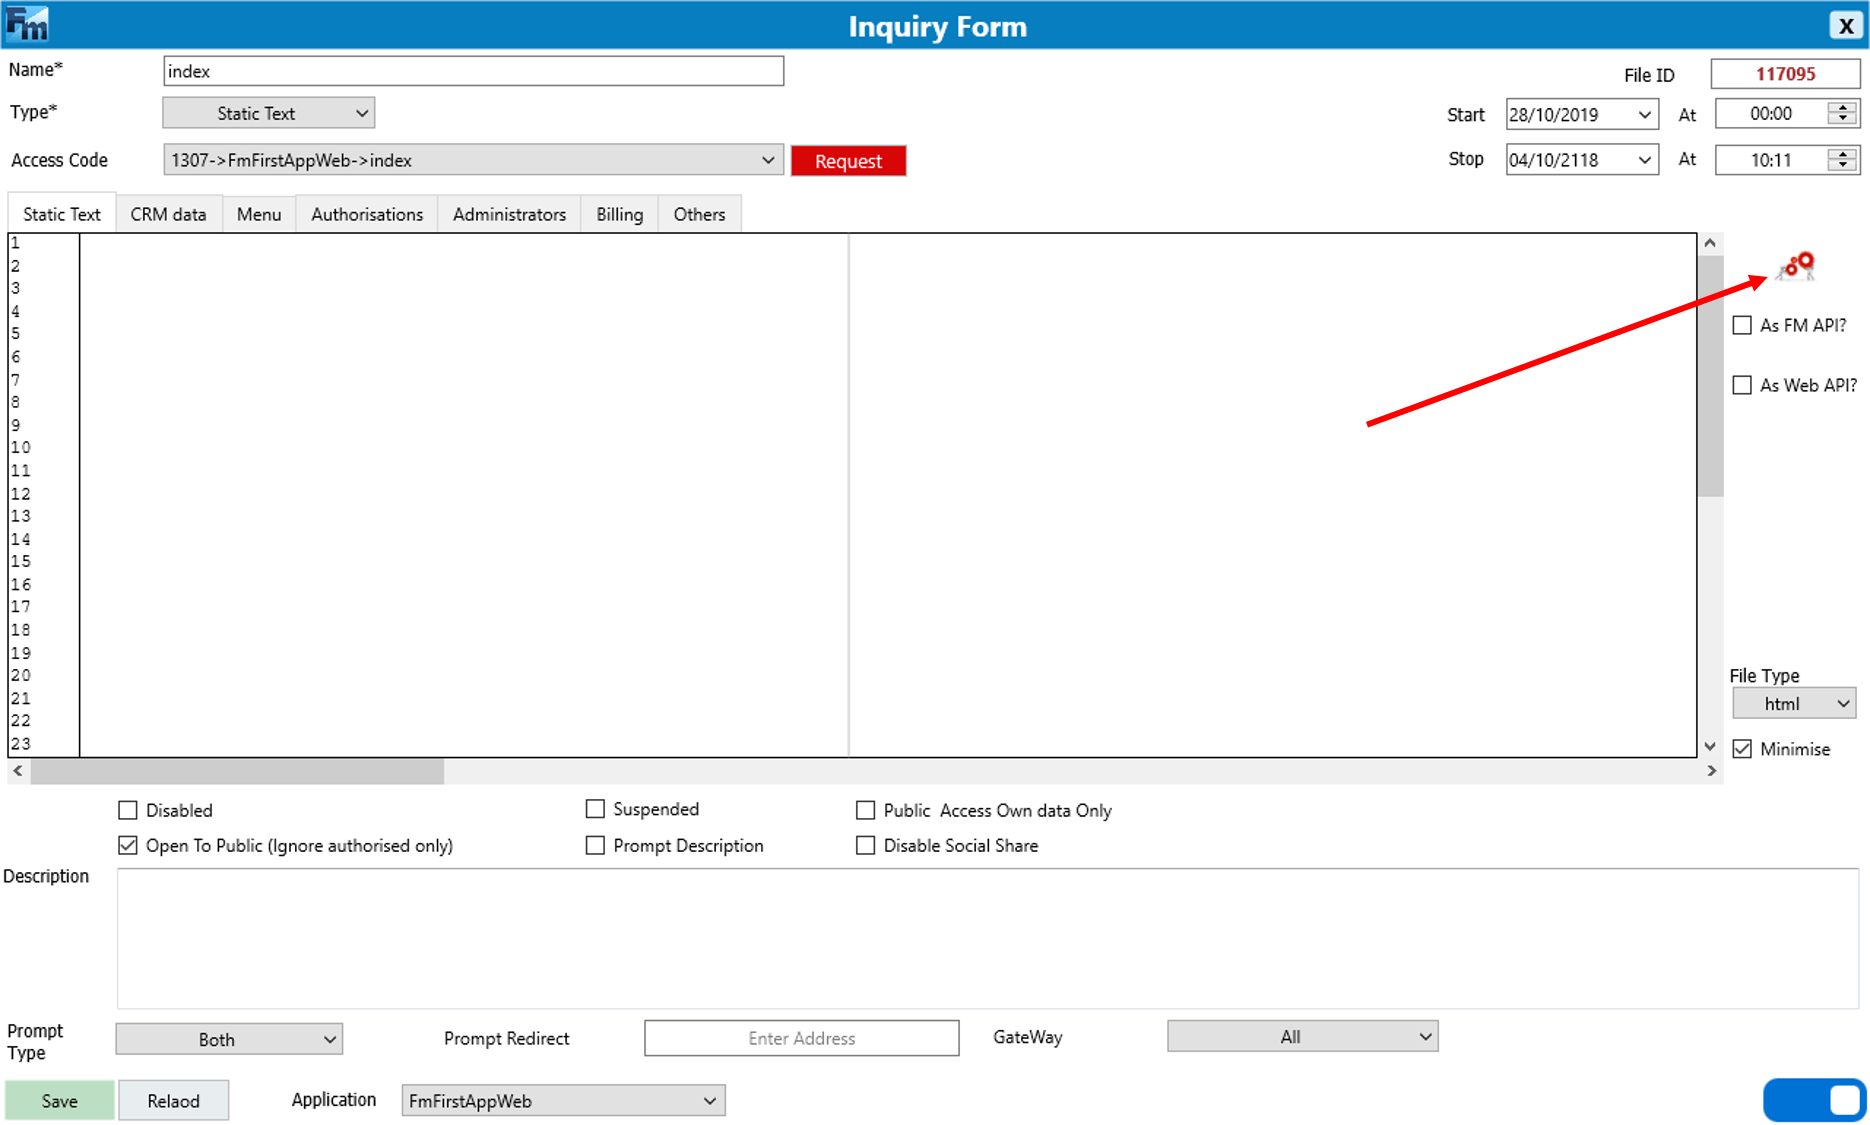
And there the file isloaded in the compiler. After making the changes, for example insert the code below;
<!DOCTYPE html>
<html lang="en">
<head>
    <meta charset="UTF-8">
    <meta name="viewport" content="width=device-width, initial-scale=1.0">
    <meta http-equiv="X-UA-Compatible" content="ie=edge">
    <title>Document</title>
    <style>
        html,body{
            width:100%;
            height:100%;
            overflow:hidden;
            background-color: 4zure;
        }
        .test{
          color:#fff;
          background-color:blue;
          align-self: center;
          top:40%;
          left: 5%;
          right: 5%;
          position: absolute;
          text-align:center;
        }
    </style>
</head>
<body>
        <h1 class="test">Hello World Fm</h1>
</body>
</html>
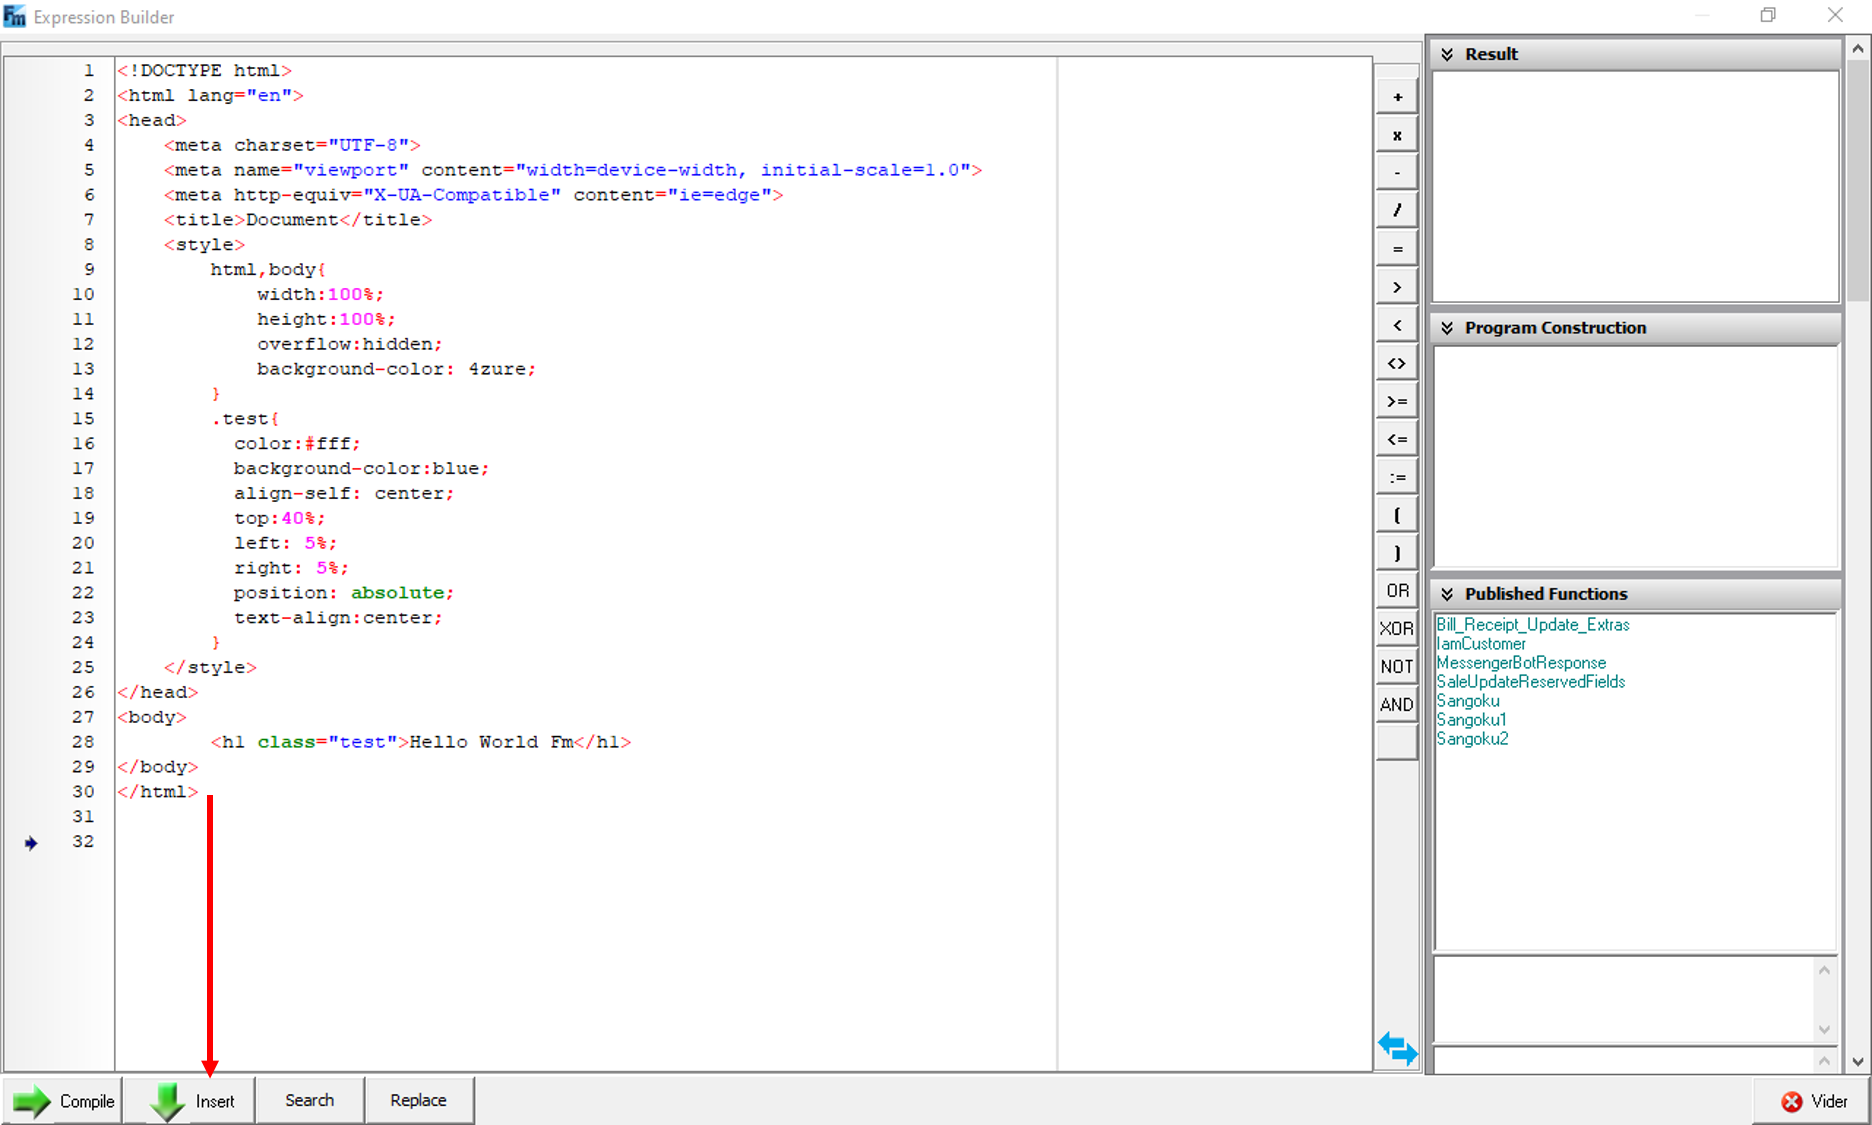
After modification, Click on the Insert button to close the compiler and then on the save button to save the changes made to this file.
Calling files
As we said before, all the files created in the "application folders" window are housed in the Production folder. The link to a file is: filename.extension. example: style.css
We agree that we can not include for example an image in the project, so how do ????
External files
To import other files into the project proceed as follows.
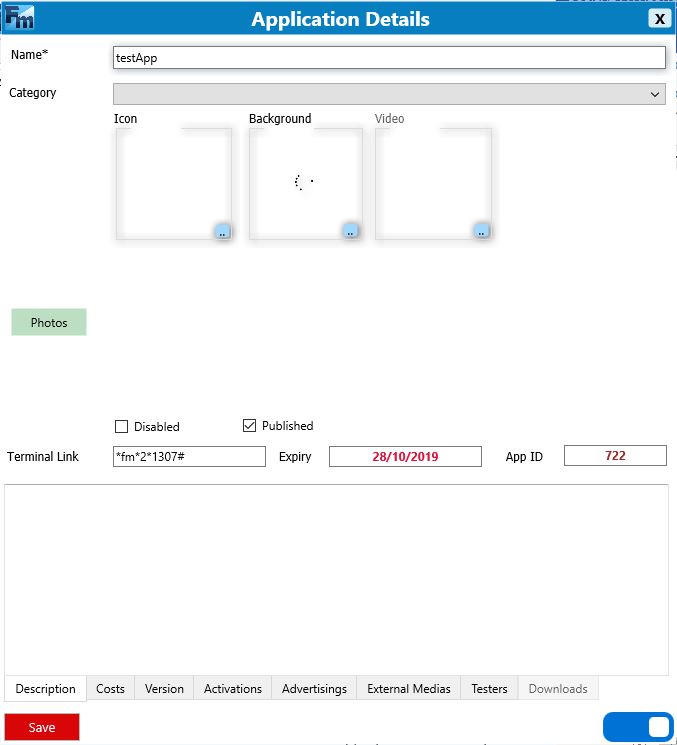
Close the project completely and click on the gearwheel next to # (above the name of the applet)
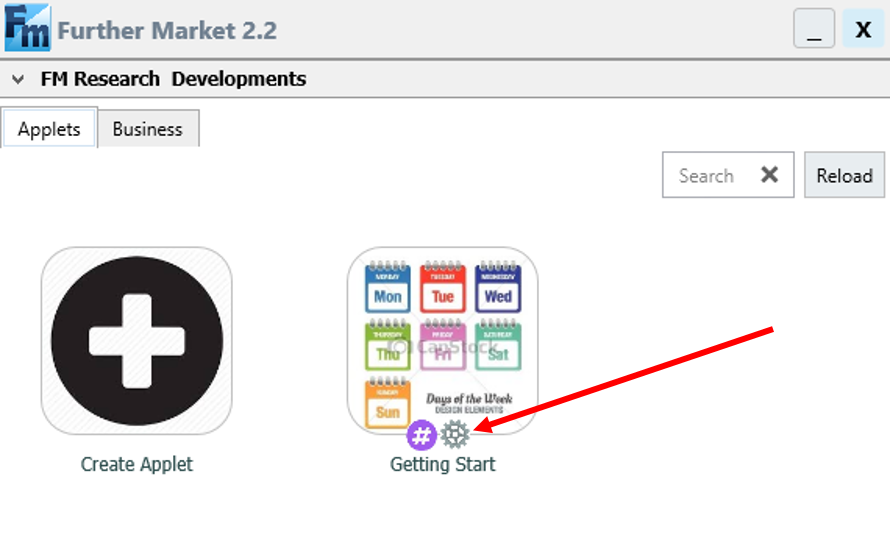
And There you go ! ! ! we are back on the interface below😊 !
Click the External Media button =>List =>AddFiles; the window below appears.
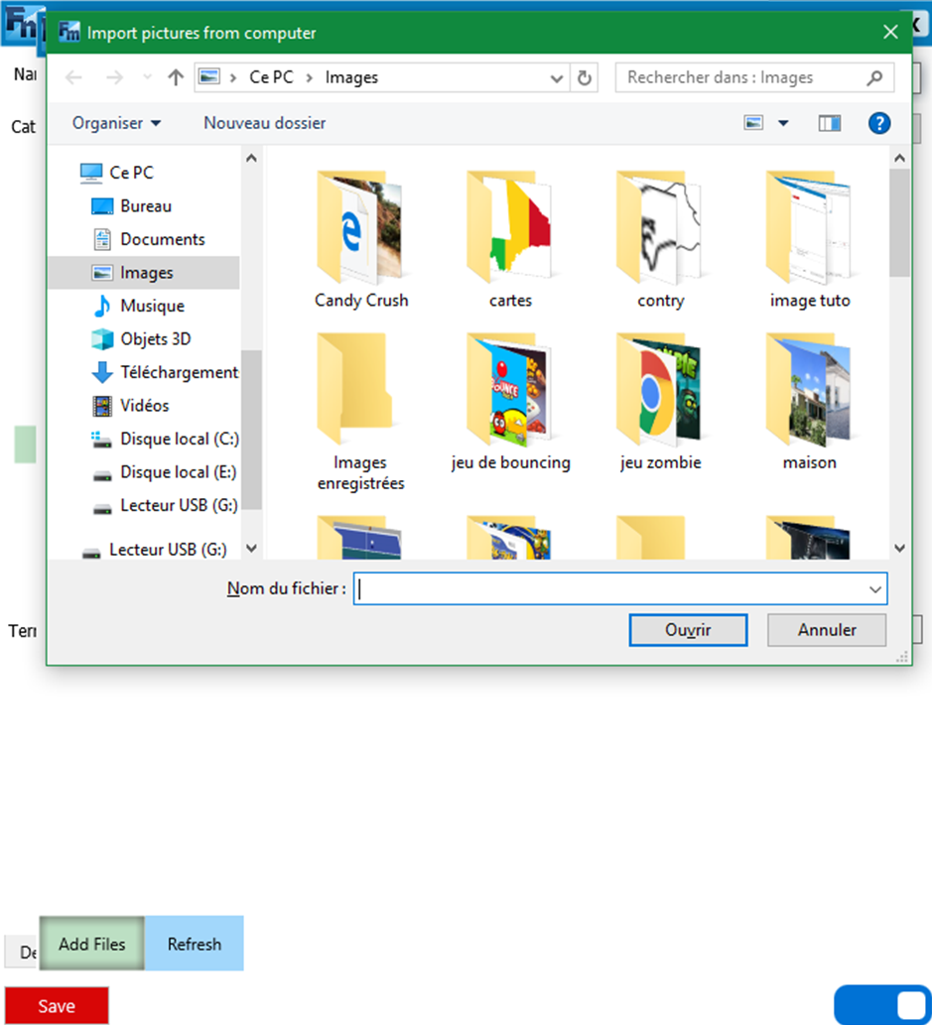
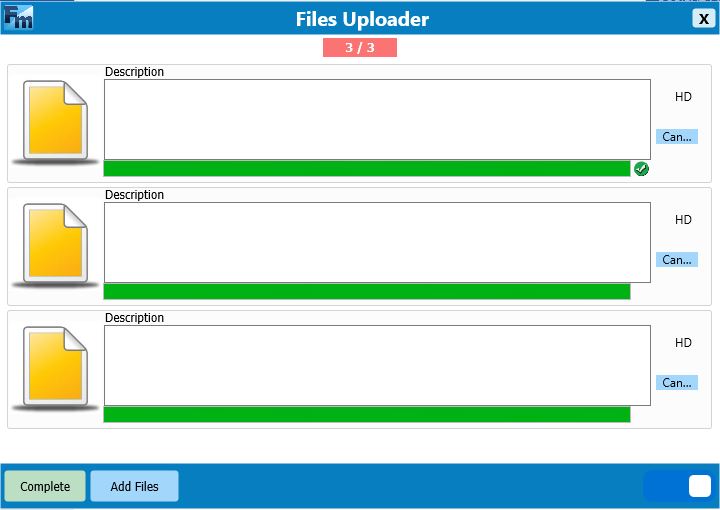
Fill in the path to the file (s) and click on Open. Now it is necessary to wait until in the upper zone which carries the number of files to be uploaded one is a progression of 1 / X ... to x / x; at x / x this area flashes red / blue, proof that the files have finished loading (here x represents the number of files to upload). At this point, click on complete to complete the import of the files and on Save to close the interface "Application Details".
Notice : keep in mind that the downloaded files are housed in a folder called "External"!
Now the files are imported into the project but are not called in the application; how to call a file from the External folder in the applet? ? ?
Call external files to the project
From the "External" folder, To use a file present in the Production folder, use the following link: "../Production/Name_of_file.extension";
From the "Production" folder, To use a file present in the External folder, use the following link: "../External/FileName.extension";
Le versioning
After modify in geach web project, we must increment its version soth at it can be updated in the production folder. The procedure is as follows:
Close the project completely and click on the gearwheel next to # (above the name of the applet).
And There you go ! ! ! The following interface appears once again😊 !
Click on the Version =>New button, the interface below appears (Production Version)
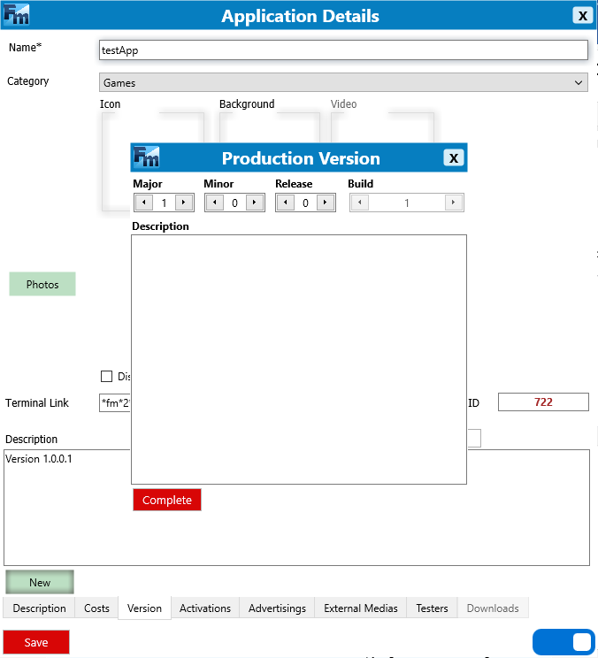
Increment the version and click Complete, then Save. We can download now and test our applet. To do this, click here. The resultis as follows:
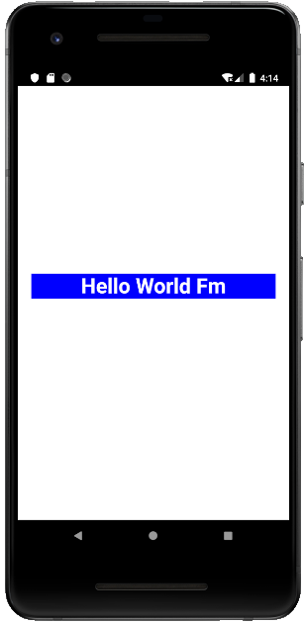
Practice
We are going to create an applet from scratch. This one will have two tabs :
- Home to print the hello word message
- About to display Further Market plate-form
Below is the app that will develop

Let’s start by list differents files that will use to develop our app
- Index.html : it's the main file of the application
- App.js
- Style.css
- Jquery.js
- And the Fontawesome 5.11.2 library
signup and create project
First, you must signup in further market(into your business account).
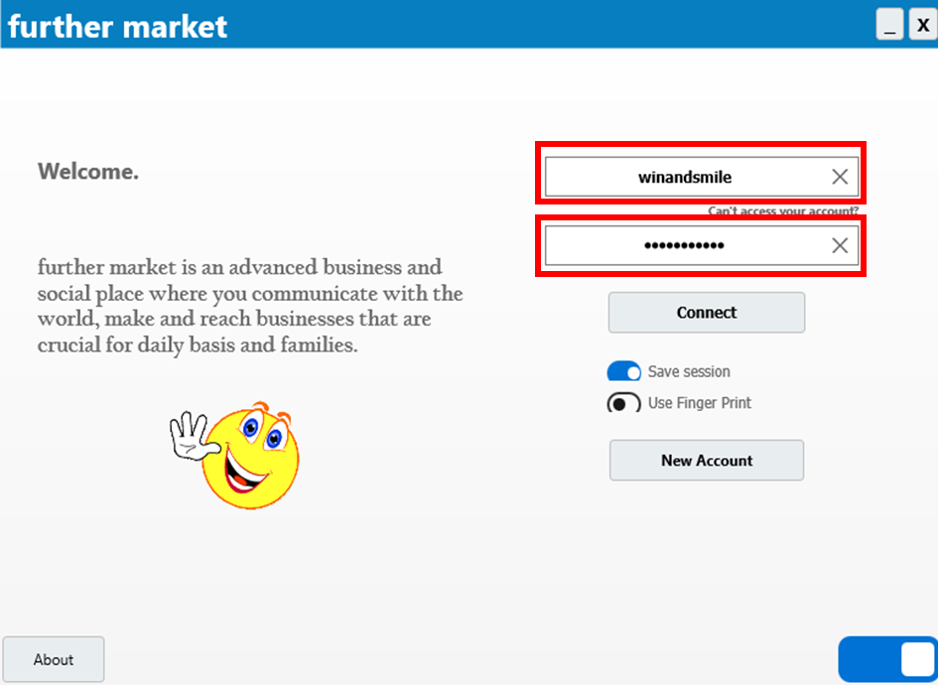
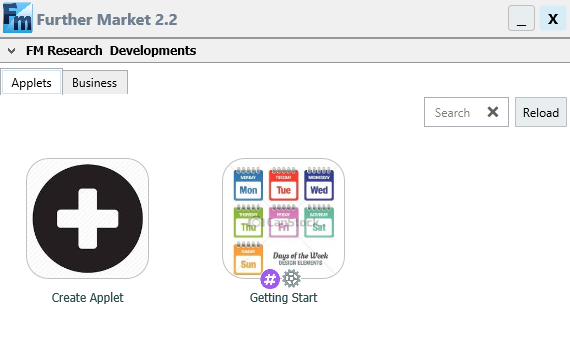
This window below will appears, click on Create Applet

Follow steps below
- 1. Enter the name of the applet;
- 2. select the category;
- 3. insert the logo of the applet;
- 4. click on save
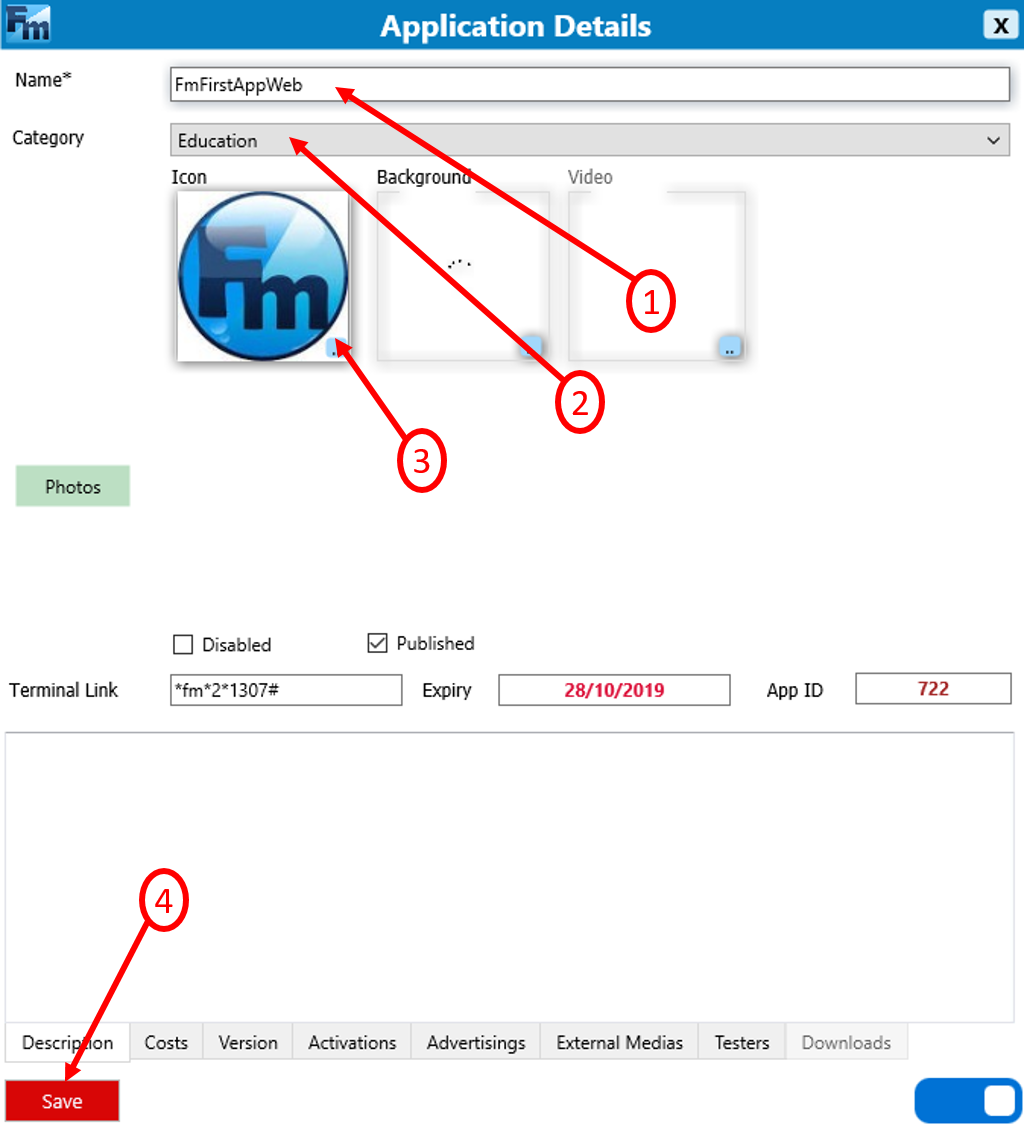
And here is the project is created.
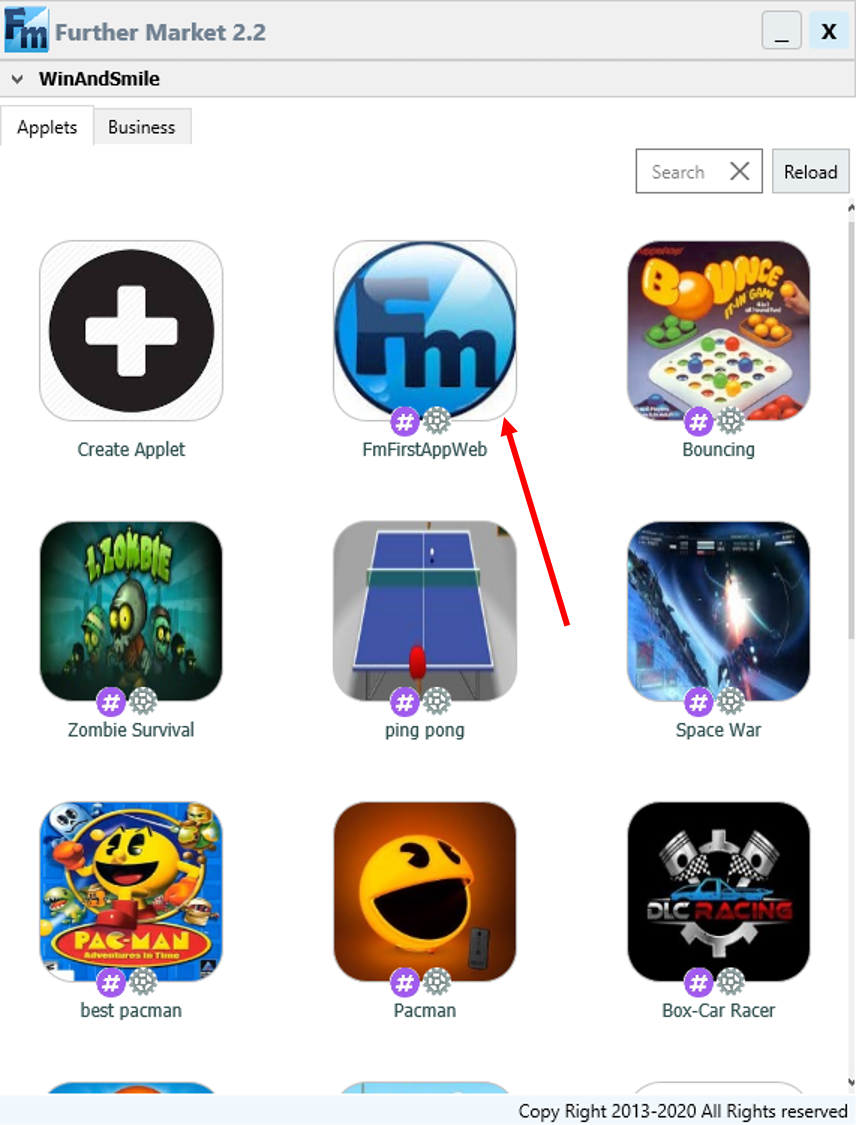
Click on the project icon to open it and create the first four files.
The index file iscreated as shown below.
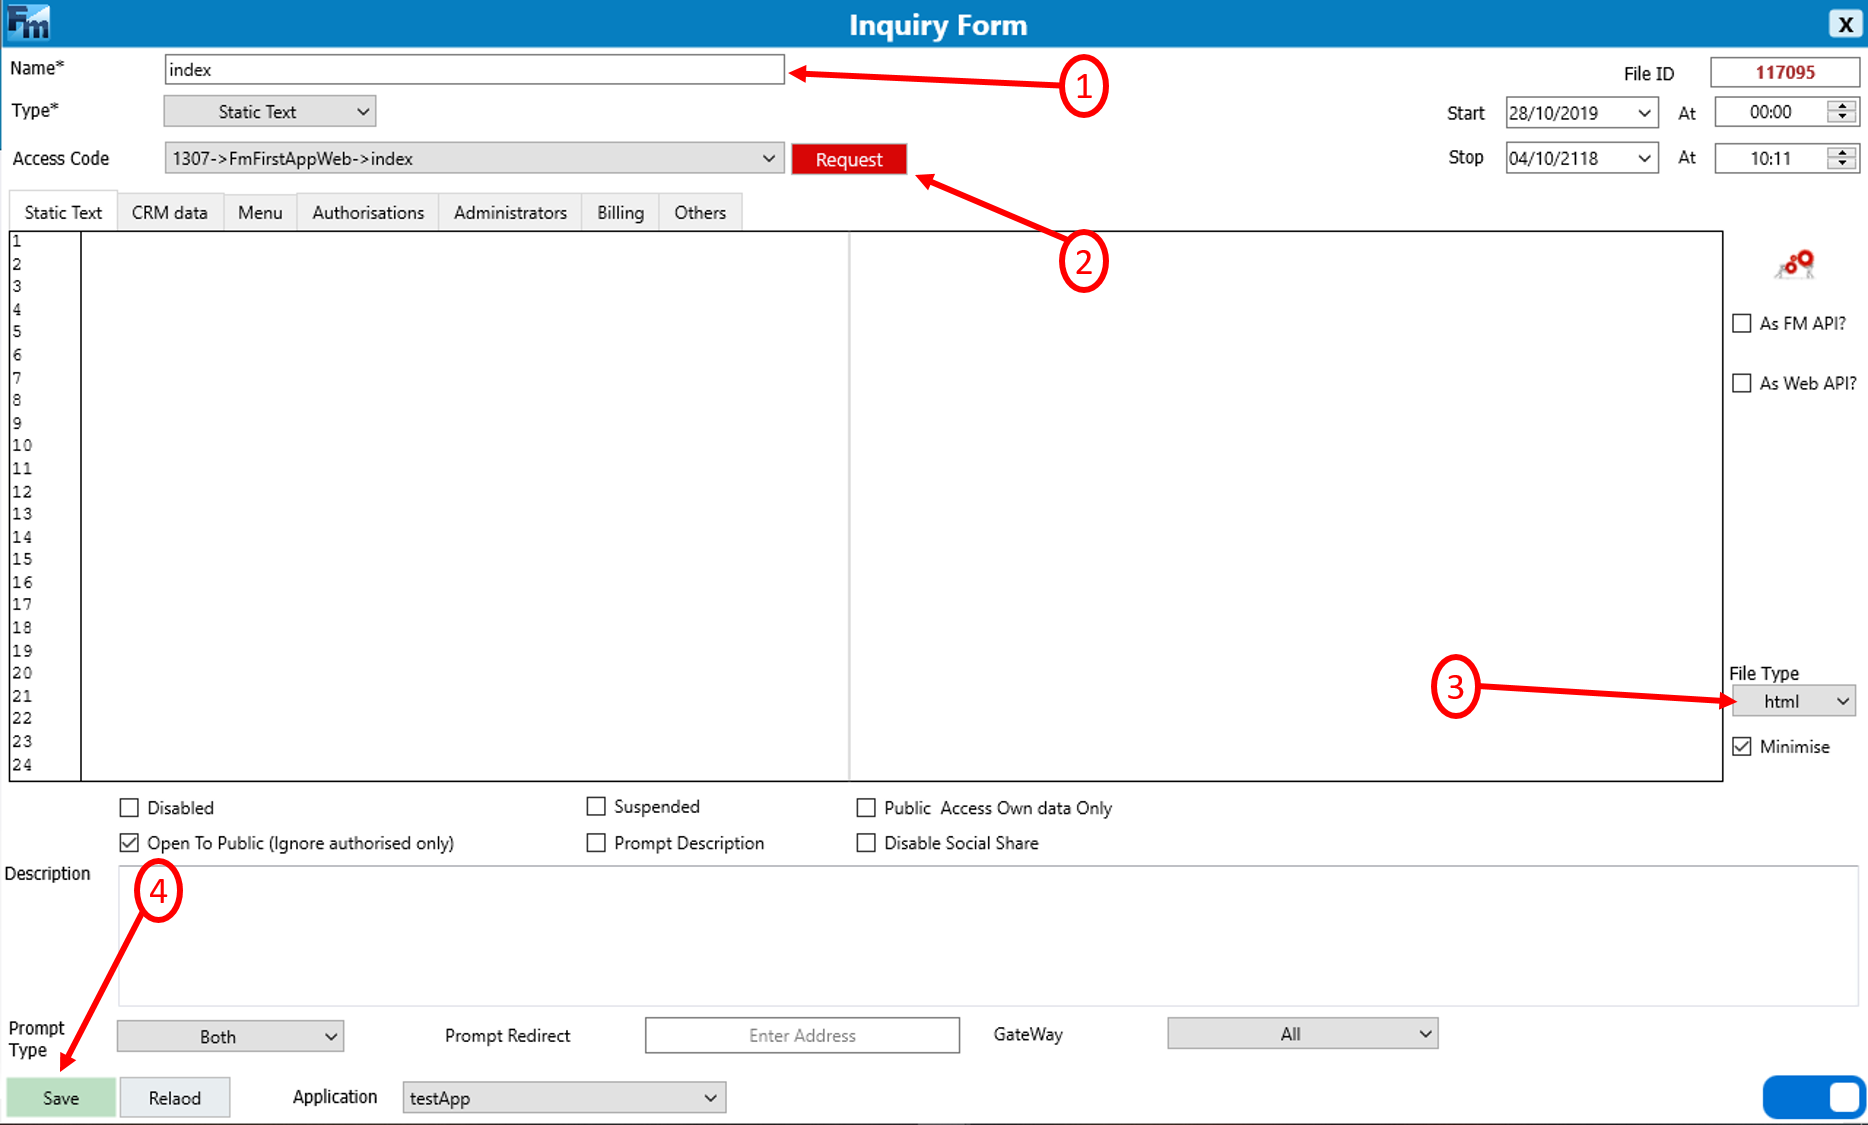
Click the Add button on the far left of the page;
-
1. fill in the name of the file in the process of creation (index).
-
2. Since this is the main file, click the Request button to generate the access code.
-
3. to, the extreme right of the window, choose the file type (html) ;
-
4. Click Save to save the changes.
In the same way, let's create the App.js, Style.css, Jquery.js files;
Note : for the other two files we will not generate the access code because this code is only generated on the index file. We get that.
Introduce the code below in the index file :
<!DOCTYPE html>

<html ng-app="app">
    <head>
        <meta http-equiv="Content-Type" content="text/html;charset=UTF-8">
        <meta http-equiv="Content-Security-Policy" content="default-src 'self' data: gap: https://ssl.gstatic.com 'unsafe-eval'; style-src 'self' 'unsafe-inline'; media-src *; img-src 'self' data: content:;">
        <!-- <meta name="format-detection" content="telephone=no"> -->
        <meta name="msapplication-tap-highlight" content="no">
        <meta name="viewport" content="initial-scale=1, width=device-width, viewport-fit=cover">
        <link rel="stylesheet" type="text/css" href="style.css">
        <link rel="stylesheet" type="text/css" href="../External/font-awesome.min.css">

        <title>My First App</title>
        <script src="jquery.js"></script>
    </head>
    <body>
        <header class="header">
            Fm Web App (My First App)
        </header>
        <section class="view" >
            <section class="home">
                <h1 class="hwFm">Hello World Fm</h1>
            </section>
            <section class="about">
                <p>Lorem ipsum dolor sit amet, consectetur adipisicing elit. Id vitae, cumque nobis a culpa pariatur modi corporis numquam suscipit voluptatum iure sit, fuga in corrupti deleniti officia molestiae. A, debitis!</p>
                <p>Facere quis est, ad sunt explicabo accusantium provident labore. Aperiam voluptates officiis cupiditate incidunt laboriosam. Dolore tenetur minus quae ipsa odit quas? Voluptatem eos eum aspernatur illo facere consectetur reiciendis!</p>
            </section>
        </section>
        <nav class="nav">
            <span class="btnHome active"><i class="fa fa-home"></i></span>
            <span class="btnAbout"><i class="fa fa-globe"></i></span>
        </nav>

        <script src="app.js"></script>
</html>
- Double-click on the file to open it
- then click on the compiler's icon
- copy / paste the code above
- click Insert and finally save to close the file
Do the same for the other two files
Script file:
$('.hwFm').addClass('hwFmActive')
$('.about').hide();

$('.btnHome').on('touchstart',function name() {
    $('.about').hide();
    $('.btnHome').addClass('active')
    $('.btnAbout').removeClass('active');
    $('.home').show();
})

$('.btnAbout').on('touchstart',function name() {
    $('.home').hide();
    $('.btnAbout').addClass('active');
    $('.about').show();
    $('.btnHome').removeClass('active')
});
Style file :
html, body{
    overflow: hidden;
    top: 0;left: 0;right: 0;
}
*{
    box-sizing:border-box;
}
.header{
    position: absolute;
    top: 0;left: 0;right: 0;
    height: 60px;
    line-height: 60px;
    color: #fff;
    text-transform: uppercase;
    text-align: center;
    font-weight: bolder;
    background-color: #11a7ab;
}
.view{
    position: absolute;
    top: 60px;right: 0;left: 0;bottom: 60px;
}

.nav{
    position: absolute;
    bottom: 0; left: 0;right: 0;
    height: 60px;
    line-height: 60px;
    text-align: center;
    background-color: #4f597b;
    overflow: hidden;
    color: #fff;
    zoom: 1;
}

.nav span{
    padding-top: 2.5%;
    display: block;
    width: 50%;
    float: left;
    color: #fff;
}
span:first-child{
    border-right: 1px solid #1F253d;
}
.active{
    border-top: 3px solid mediumblue;
    /* transform: translateX(5%) translateY(0); */
    background-color: crimson;
}
nav span i{
    height: 100%;
    width: 100%;
    font-size: 2em;
}
.about{
    position: absolute;
    top: 0;left: 0;right: 0;bottom: 0;
    overflow-x: hidden;
    overflow-y: scroll;
    padding: 0 15px;
    text-align: justify;
    -webkit-overflow-scrolling: touch;
}

.hwFm{
    color:#fff;
    align-self: center;
    top:40%;
    left: 5%;
    right: 5%;
    position: absolute;
    text-align:center;
  }

.hwFmActive{
    background-color:blue;
    transition:background-color 10s;
}
jquery file:
Download the file jquery.js and copy / paste its contents in the jquery file of our project.
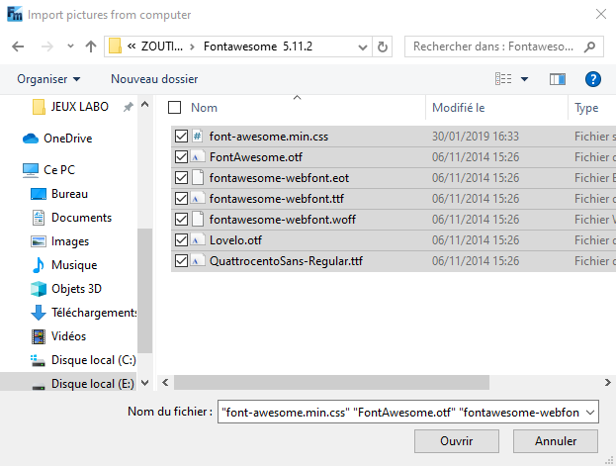
Now, close the project and import the Font-awesome files. Click on the pini on next to # (above the name of the applet).
Click the External Media button =>List =>Add Files; the window below appears. Fill in the path to the Font-awesome folder, select the files and click on open.